Today, we will talk about common mistakes in the overmolding Process. The overmolding process is a proven manufacturing technique that allows you to combine two or more materials into a single, cohesive product. It’s especially popular among plastic product manufacturers who want to improve functionality, aesthetics, and performance in their components.
By molding one material over another, you can achieve better grip, insulation, or protection without relying on extra parts. However, this process has its pitfalls. From selecting incompatible materials to neglecting the right molding temperature, there are several common mistakes that can derail your projects.
Below, you’ll find practical advice on how to avoid these mistakes and keep your overmolding process running smoothly. By taking a proactive approach, you can prevent defects, reduce waste, and ultimately deliver products that stand out in both quality and performance.
Know the basics of overmolding
If you’re new to the overmolding process, it helps to start with the fundamentals. Overmolding typically involves molding a thermoplastic material over a base layer or substrate, which can be another thermoplastic, thermoset, or even metal. The result is a single component that merges the core (substrate) with the overmold (top layer) without adhesives or secondary assembly.
Typical applications
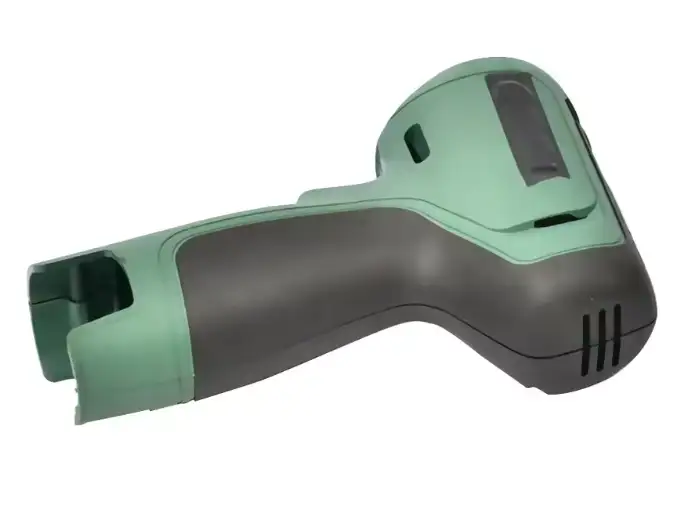
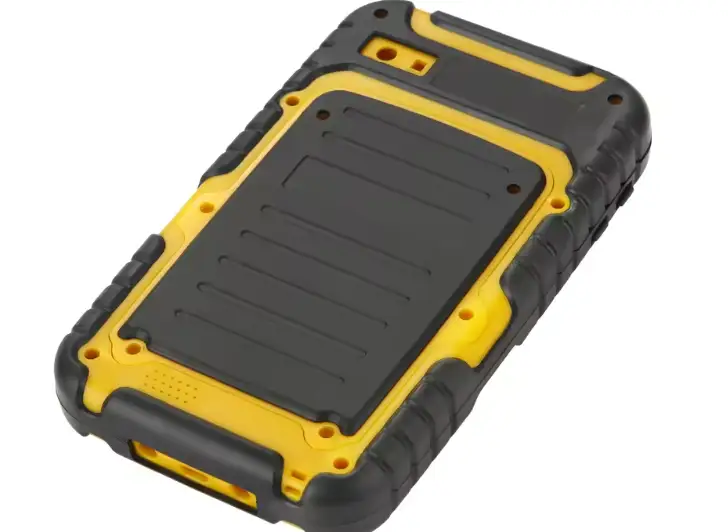
- Grips and handles
- Soft-touch surfaces for electronic housings
- Protective seals and gaskets
- Shock and vibration dampening
When done correctly, overmolding saves time, lowers production costs, and offers enhanced functionality. You’ll skip labor-intensive assembly steps because two or more materials fuse during molding, forming a durable bond that remains stable even under stress. In many cases, overmolding also strengthens your product’s structure, so it can withstand impacts or environmental hazards.
Start with a clear goal
Before diving into the technical details, ask yourself what you want to accomplish with overmolding. Are you trying to improve ergonomics? Provide extra insulation? Create a stylish or textured exterior? Understanding your core objective will determine material choices, design constraints, and process parameters.
Overlooked design considerations
Design flaws often trigger downstream errors in the overmolding process, making it one of the first areas you should evaluate. If the product design is too complicated, or if critical features like hooks, recesses, and undercuts aren’t identified early, you could end up with poor bonding or trapped air in the mold.
Avoid overly thin walls
Thin walls are great for saving material, but they can be prone to warping or breakage during molding. This risk grows if you’re overmolding a harder material on top of a softer substrate. If the walls of your substrate are too thin, the injection pressure used to apply the second material might deform or damage it.
- Strive for uniform thickness across the part
- Include ribs or gussets to add support
- Vet your design through simulation
Plan for material flow
It’s easy to overlook how molten plastic will navigate the mold cavities. If your design features complex geometries or tight corners, you could encounter short shots (when the material doesn’t fully fill the mold), leading to incomplete surfaces and poor aesthetics. When in doubt, consult mold flow analysis tools. They help reveal potential weak points, flow restrictions, and air traps.
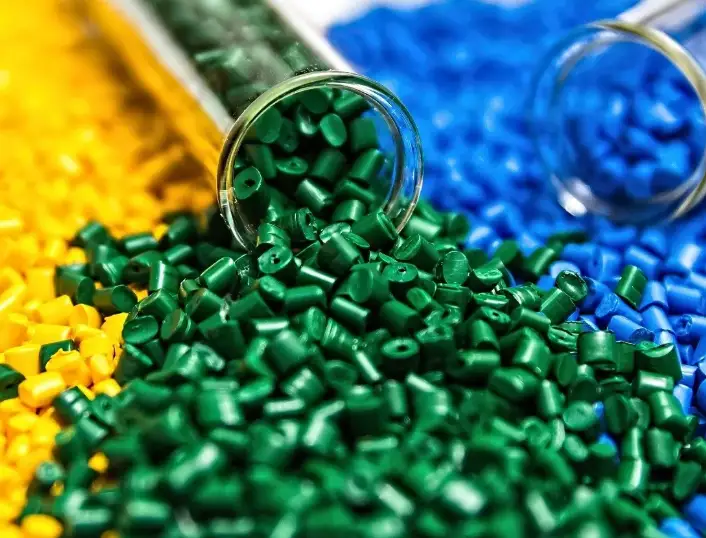
Material mismatch issues
Material selection plays a pivotal role in the outcome of your overmolding process. If your substrate and overmold layer aren’t compatible, you can expect problems like delamination, incomplete bonding, or even chemical reactions that degrade the materials.
Choose compatible polymers
Polymers have different molecular structures and surface energies. This means some combinations are more likely to bond than others. For instance, certain thermoplastic elastomers (TPEs) bond well to polypropylene (PP) or polyethylene (PE), while others aren’t well-suited for those substrates.
- Verify compatibility with supplier data sheets
- Conduct adhesion tests on potential combinations
- Factor in final application requirements (e.g., temperature tolerance)
Watch out for shrinkage rates
Different materials shrink at different rates as they cool. If the substrate goes through significant shrinkage, and the overmold material doesn’t, internal stresses can build. Over time, these stresses may weaken the bond or create visible defects. Aim to select materials with similar thermal properties, or adjust your processing strategy to accommodate varying shrinkage rates.
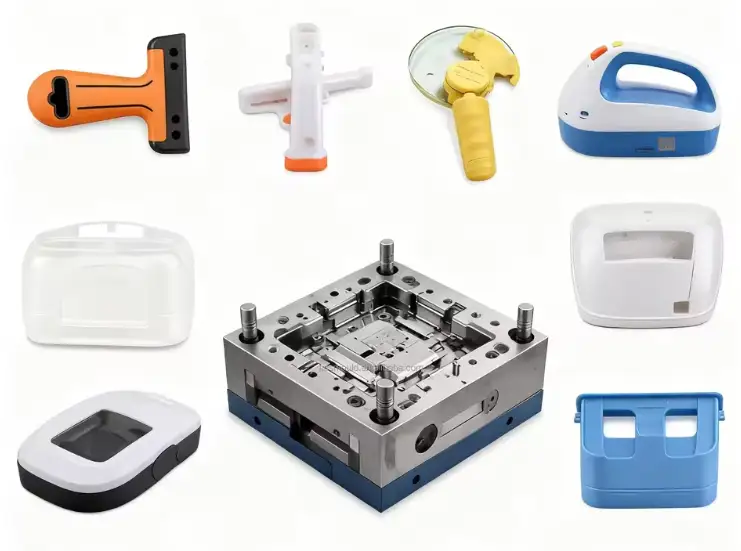
Poor tooling or mold design
Your mold design is the blueprint that dictates how smoothly your overmolding process runs. A mold that isn’t optimized for multi-material injection can cause flash, poor venting, and generally inconsistent parts.
Pay attention to venting
Venting allows trapped air or gases to escape during molding. If your vents are insufficiently sized or positioned, air pockets can become trapped in the mold, leading to short shots, bubble formation, or incomplete bonding. Place vents at strategic points where air is most likely to accumulate, and ensure they’re easy to clean.
Include shut-off features
Overmolding typically involves two or more shots. For that reason, your mold should include clear shut-off features to isolate each shot and ensure that plastic doesn’t flow into areas not intended for overmolding. Neglecting shut-offs can result in flash—a thin layer of material seeping out along the parting line—and other dimensional inaccuracies.
Inaccurate temperature and pressure settings
Once you’ve nailed the design and chosen compatible materials, you must ensure that the machine settings are spot-on. Over or underheating can compromise your materials’ mechanical properties, while the wrong injection pressure can lead to incomplete fills or flash.
Dial in melt temperature
The melt temperature for the overmold material should be high enough to promote flow and bonding, but not so high that you degrade the substrate or destroy its surface. Every polymer has an optimal range, which you can find in the supplier’s technical data sheet. Take the time to run test shots to tweak temperature settings, ensuring you get a complete fill without burning.
Optimize injection speed
Injection speed is another critical parameter. Injecting too fast can trap gas or create turbulence, resulting in defects. Going too slow may yield incomplete fills or visible weld lines. Begin with a moderate rate, observe the outcome, and gradually adjust based on part appearance and performance. A consistent injection speed is often better than a highly variable one, especially if you’re new to overmolding.
Neglecting proper surface preparation
The bond between your substrate and overmold layer is only as strong as the surface contact. Even minor contaminants can reduce adhesion, leading to delamination or peeling.
Clean and dry your substrate
Dirt, oils, moisture, and residues act as barriers—making it harder for the overmold material to fuse effectively. Always ensure your substrate is free from contaminants before the second shot. In some industries, plasma treatment or primers are used to improve bonding, depending on the materials involved.
- Wipe with a suitable solvent (check compatibility)
- Use air blow-offs or a vacuum station to remove debris
- Store your substrate in a dry, dust-free environment
Add texture where needed
A bit of surface texture can boost mechanical interlocking. Roughening or texturing specific areas of the substrate increases the surface area for the overmold material to grip. Just be sure not to overdo it, as excessive texturing can create stress concentrators or aesthetic issues. Strike a balance that enhances adhesion without compromising the design.
Overlooking process monitoring
Even the most thorough design and setup won’t guarantee success if you ignore real-time process monitoring. By keeping an eye on your machines and collecting data, you can detect problems early and correct them before you end up with an entire batch of flawed parts.
Set up regular inspections
Periodic inspections help you spot inconsistencies or deterioration in performance. Essential checks include verifying that mold temperatures match your target settings, monitoring part dimensions, and looking for signs of flash or short shots. Encourage an environment where operators openly communicate and document any anomalies.
Embrace data logging
Modern injection molding machines often come with data logging capabilities that let you track temperature, pressure, and cycle times for each shot. Reviewing these logs can reveal trends or recurring issues. If you see a sudden spike in pressure or an unexpected temperature drop, look into it immediately before the entire run becomes compromised. Over time, analyzing these logs can help you fine-tune your process parameters for different materials or part designs.
Rushing production timelines
You may be under pressure to deliver products quickly, but rushing the overmolding process can be counterproductive. Cranking up the speed without carefully considering the impact on materials, temperatures, and machine settings can result in a high volume of defective parts.
Allow for cooling time
When you remove parts from the mold prematurely, they might still be in a semi-molten or overly soft state, making them prone to distortion. This is especially problematic in overmolding, where the second material can cause additional stress on the substrate. Give your products adequate time to cool and cure between shots. While it may feel like a slowdown, you’ll likely recover that time by avoiding rework or scrapping flawed parts.
Balance speed and quality
It’s tempting to optimize your cycle time to the absolute limit, but be mindful of the hidden costs. Frequent shutdowns to troubleshoot or retool can disrupt your workflow. A stable, consistent pace might ultimately serve you better—particularly if it ensures minimal defects and a reliable production output.
Skipping maintenance and calibration
The best molds and machines will degrade over time if you don’t maintain them properly. Regular checks, cleaning, and calibration keep your equipment in top shape, allowing you to produce parts that meet design specifications.
Inspect mold cavities
Mold cavities can accumulate residue, wear, or damage that affects the quality of your parts. Set up a cleaning schedule to remove residue from vents, ejector pins, and parting lines. For complex molds or higher volumes, a more frequent maintenance routine may be necessary. Anchoring this practice in your standard operating procedures ensures that maintenance is never pushed aside when you’re busy.
Calibrate machines
Over time, temperature sensors, controllers, and pressure gauges can drift from their original settings. This drift may seem small, but it can lead to incremental changes in melt temperature or injection pressure that alter your results. Calibrating equipment on a routine basis is one of the easiest ways to maintain consistent performance.
Plan for scaling up
Maybe you’re starting with a single mold or a pilot run. If your product takes off, you will have to scale up quickly to meet demand. It’s crucial to plan for this from the start so you don’t get blindsided by capacity issues or design limitations when orders multiply.
Design for multiple cavities
Single-cavity molds are fine for small production runs, but if you anticipate a jump in volume, consider scaling up to a multi-cavity mold. This approach multiplies your output per cycle. Just note that the complexities also multiply, so thorough analysis and design checks become even more important.
Adopt modular approaches
Modular tooling lets you adapt to production changes without having to rebuild your entire mold setup. With modular inserts, for example, you can quickly replace or modify certain sections of the mold to accommodate new features, materials, or design tweaks. This agility saves you time and money in the long run, while also reducing risk.
Keep your overmolding process on track
While each project has unique requirements, many pitfalls in overmolding stem from the same core issues: design oversights, material mismatches, poor mold setup, and rushed production. By staying vigilant and addressing these areas early, you set yourself up for success in creating reliable, high-quality parts.
- Begin with a thorough understanding of the overmolding process and your end goals
- Make design choices that accommodate material flow and bonding
- Select compatible materials that share similar shrinkage rates
- Optimize mold tooling, venting, and shut-off features
- Tune in machine settings for proper melt temperature and injection speed
- Maintain a clean, prepared substrate for solid bonding
- Use real-time monitoring to catch problems before they escalate
- Balance production speed with product quality
- Keep equipment in good shape and calibrate regularly
- Plan ahead for production increases and design modifications
With the right balance of design, materials, and process control, overmolding can be a game-changer for your plastic products. It offers new possibilities in functionality, style, and durability—attributes that can help you stand out in a competitive market.
By avoiding these common mistakes, you’ll preserve valuable resources, reduce downtime, and reinforce your reputation for delivering exceptional parts. Above all, remember that continuous refinement and proactive troubleshooting are keys to mastering the overmolding process.